 What caught my eye was the RSJ and pulley to access the first floor door which would indicate the need to get heavy or bulky items upstairs. There is no evidence of a chimney either so a store seems favourite.
 What caught my eye was the RSJ and pulley to access the first floor door which would indicate the need to get heavy or bulky items upstairs. There is no evidence of a chimney either so a store seems favourite.
  Nothing much to add to what has already been said other than in a nutshell it's a Tri-ang shorty brake van chassis some 60thou sheet and various sizes of Evergreen and Slaters strip. Some bog paper,a biro refill, some 1mm brass rod and a pin.
 With virtually no spare time at the moment due to driving into London daily to watch transvestites hurl insults at each other, the modelling has stopped. Though I did manage an hour to stick some top quality bog paper to the roof of the brake van and fashion some steps from 60thou sheet.
 There are three rolls of Asda bog roll in stock which is quilted and thus totally unsuitable for the roof. In the time I have available in the next few weeks it'll probably be footboards first.
 In true PDH fashion I need the chassis for something else, so as the Schoma hasn't been used for over a decade it is seen as a suitable donor. This then could be it's final portrait.
 After a few trials of solvent to see if the acetate(?) would be attacked a happy half hour was spent grinding a piece of shirt packing to exactly the right size and dribbling some plas-weld into the joint. So far so good.
 Like any self-respecting 60's/70's schoolboy I was brought up on Saturday afternoon Airfix kits and Humbrol Enamels. Then 15+ years go,almost overnight, and largely due to comments in Iain Rice's wagon books I switched to Acrylics; water-based, less smell, quick drying. After Warley and conversations with Geoff Taylor and Ian Rathbone I questioned this move. They both unreservedly use Humbrol Enamel and get excellent results especially with a bow-pen. Bob Fridd whose work I admire also is a fan of the smelly stuff as is Alan Brackenborough.
 Getting handrails straight is a real bugger. This is taking longer than I thought.
 Working on the 'rude-not-too' brake in odd half hours when the RAF and the Dutch Revolt don't get in the way. Inner-end part done and all roughly blu-tacked to the floor. I qute enjoy brake vans as they're a bit more than a box and there are more problems to get around.
 Scratch, scratch. Drill, drill. Cut, cut. Slice, slice. End with measles.
 Note Mr. Hill's tidy wiring idea from redundant comb-binding UHU'd to the baseboard. Neat eh?
 Also started yesterday: the brake van for the 'Rude-not-to' project. Tri-ang chassis again which makes it ultra-short, but no worse than the Corris example. Floor cut and stuck from a sheet of 40thou Evergreen that I'd forgotten I had which is 'grooved' at 1/4" intervals which saves a bit of scratching.
 Construction: 40thou floor, 60thou sides scribed to suit. Various bits of strip and 20thou for the corners. This from a very old piece given to me by Stig which snapped after it was bent. This meaning I had to fill the corners with Tipp-ex and sand into a curve. Bolt heads from micro-strip slices and rivets with an old compass point. Paint all Humbrol acrylic and G**es Workshop grey to finish.
 Steam is forced in, where it condenses to water, forcing oil, which now floats on top, to run down a pipe to the cylinder. The reasons for the chimney mounting are purely gravity linked. Further details of Mr. Ramsbottom and his injector can be found here:
 This when the Ibertren Cuckoo chassis were off the market and changing hands for silly money. Unusually for me I'd mislaid it and it turned up in a small box marked 'possible 09'.
 Gaps are a bit personal. I mentioned Laurie Maunder in part one. Laurie's system is to gap down between the blade and the stock rail thus connecting the stock rail to the middle and changing its polarity to either side. I tend now to use the EM Gauge society gapping suggestion with a couple of mod's: From the right gap down the middle to the arrow where the rails should be cut. with a disc or saw. Beyond the arrow gap down the middle of each road. This means the 'frog' to the right of the arrow is dead and needs a switch to change the polarity, but the blade is live to its own side all the time.
 Finally put the plug in the sink and wash the entire thing with a dollop of cream cleaner and an old toothbrush. Then remove the old toothbrush from the bathroom. Mrs F. tends to brush her teeth with the light off, but dislikes the taste of flux...
 Now to tie-bar. Here I've used a length of 4mm copperclad, but you could shave down a bit of the 7mm stuff. referring to your PECO point slide under the rails and mark inside where the blades will go when switched one way or the other. Drill a small hole at these marks and one other beyond the outside of the sleeper line. This for your connection to the lever and switch. File a gap between the blade holes and to make sure -another under the stock rail. The squiggle on the left is waste.
 At the outside of the blade holes coat the tie with felt-tip pen to stop the solder wandering under the stock rails and sticking the whole lot solid. Tin the copper and drop a short length of brass wire into the holes, solder, and bend toward the nose about 2mm above the copper.
 The curved stock rail is approached in the same way as the straight one, but first bend gently between the thumbs to the required line. Remembering that the bend starts at the tie bar intersection and ends at the point of the nose from where it must (in this case) be straight and in gauge. This will be a little fiddly-er than the straight one.
 With the bendy rail added, it should look something like the above. Two things to note: One, I'm running Triang wheelsets through this so the flangeway is quite generous. And two, the dashed arrow pointing to where the rails will be cut to isolate. This means that the 'frog' assembly at Side A will be dead and the rest will be live to the respective stock rail once the gapping is done.
 Now the fun bit. The bit that people fight shy of. Blades. Piece of 1" x3/4" timber 6" long. In this case with a saw-cut down it so the FB rail sits flat-ish. Remembering which side the blade is for... clamp down and grind away with a file until you have a nice slope down to about half the depth of the web at the last 3-4mm. Clean it up. That's it. Do this when wifey is out 'cos apparently it's 'not a nice noise'.
 Quick word on soldering: CLEAN everything! Polish the bottom of the rail and the copper sleepers. And use flux. I still use paste flux applied with a cocktail stick. Tin the sleepers with a light coat of solder, and fix to sleepers in position. Wipe the flux off and clean up with a file.
 Straight stock rail: Cut to length, mark where the tiebar will go and file a notch (5-10mm)down to just below the web. Then gently file into this notch, in this case L to R so it graduates and again take the foot (if you're using flatbottom) back a little further.
 CLEAN rail and sleepers. Tin sleepers and lay in position straight,square and in gauge with the pre-laid nose rail. Quick wipe of flux and solder on the outside. Wipe as before.
 My question is: What is the valve shown at the rear of the chimney and what is its purpose? Answers here, or email me at the address in the profile.
 Not so much a chimney, more of a manhole. Isn't it delightful?
 Great airy venue and probably the best all round show I've been to all year; knocked everything else into a cocked hat. Friendly chatty exhibitors and some cracking layouts.
 I should be sorting (or binning) the Douglas 009 kit, but the 'Rude-not-to' project draws me slightly. Converting that to 'Rhydnodu' is tempting, but 1: I have an adversion to the punning of Welsh into jolly English and 2: the 'Rude-not-to project' would need to have more of a flavour of England I think
 The second I think, is Maerdy in the 80's. 48DS and 88DS respectivly. It will be noted that the cabs can be fitted either way around...
 The main thrust was the 'legs' for the dropped beach section at the front. There was some debate to start with on the shape of this bit so it came down to doing it now and bolting some extra bits on. A piece of string was tensioned across the front to ensure that the legs were the right length. This was not a good idea as five minutes were wasted when I realised that it 'sang' quite well.
 Producing some wine only cheered the occasion if only to weight the fascia while the glue went off.


 As far as I can recall the line has only influenced one model - Laurie Cooksey's O-16.5 Fairlight Glen which appeared in RM in May 2002. Laurie's piece was not much over 4' x 2', but what about bigger?
 We tend to think of small simple plans like this in terms of small board portable layouts, but they would actually be perfect for a small system running around that otherwise useless 8x6 boxroom over the stairs. With say the sylvian station and loco shed on one side and the 'zoo' on the opposite, with the clifftop section in the middle in front of the usual window.
 The pleasure would be in the gradual build of the layout and the (scratchbuilt?) stock. Operation would be limited, but not if you apply American carload principle and use a card or dice system of loads to available stock. If the rather politically incorrect zoo was changed to some sort of small industry (fish?) then this would work very well for a one-man den layout. Any scale from 7mm to 16mm would work in the space.
 The lower shot is a very dinky ground frame taken the same day and I think at Farringdon. The subject of trains running in 'oles is one that is rarely done with this sort of scene in mind. Shame. In the right hands it would be a terrific model.
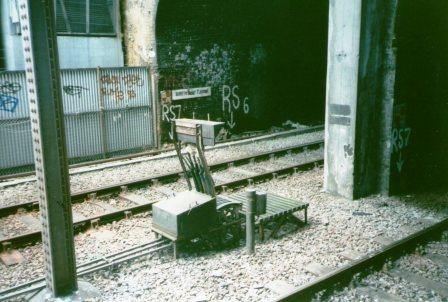
 Oddjob 4 has been in the drawer for a number of months and it's time to attack. Probably 40 years old, made by GEM I think, it consists of the contents of an old sweet tin which are: some whitemetal parts, a motor and something called Arnold. We'll see what I can bash out of it. Maybe by Expong 2011...