Showing posts with label 16mm. Show all posts

Thursday, 10 August 2023

Norfolk and Suffolk 009 group member's day


In the rush to do other things, I'd not done a little report on this one held back in June. The N&S group member's day is annual and well established in a small hall in Beccles smack in the middle of the town with parking available and a rail service. The standard was high, Graham Watling's layouts are always a joy and push the twee, and the 16mm was a fascinating surprise. Much to several people's horror the 009 Society sales stand could not attend, but the slot was ably filled by Great Eastern Models.
The hall is worth noting; possibly not ideal in many ways as it consists of a near warren of rooms and stairs. The catering was moved to a separate room outside facing the street (which may have had some passing trade benefit) and was fully stocked with stuff and some outside seating in the sun. The date for next year: June 1st.

Show 9
Parking 6
Rucksacks 0
Catering 9


Monday, 5 April 2021

Spring


 Even with snow forecast for sometime today, excellent news on the rail front. Certainly the earliest in the year since it was put together, the garden railway ran over the weekend. A little trimming back was needed and some sweeping up (why do stones appear from nowhere?). A section of the underpinning had sunk slightly, so some remedial work was carried out to lift it 1/2". Part of this included building a crude passenger platform with some odds and ends. more on this later perhaps.

Wednesday, 15 July 2020

16mm article


After a very gentle nudge from Lord Leamington I scratched out a short piece on the Houstoun Gate 16mm loco that appeared here a few months ago. Quite rightly, I'm tucked at the back like Junior Modeller. The piece describes the thinking, but doesn't detail the build - well I didn't do all of it.
A quick bit of fun and honour-bound I give it a plug here. I don't know if this is a typical issue, but it's all rather good and doesn't seem to take itself too seriously which is fine with me, but then what do you expect with a tweed wearing editor.

Monday, 6 April 2020

Sunday woodwork classes

Sunday woodwork classes
 A slight change of tack was needed. With Mrs. F. alternating between weeding and reading outside on a remarkably sunny April Sunday and with some furious rail-cutting going on in the workshop on Tiley Road. it dawned on me that it was all too easy to drop into a commission-based work schedule for seven days a week, especially with the lock down and nowhere else to go.
'I need to do MY stuff at weekends' I announced while picking at the moss around the abandoned 16mm line in the flower bed. Mrs F. just rolled her eyes and looked at the moss. 'Something to run?'

Les Coleman had given me a part- built laser-cut kit some time ago. Since then it had taken pride of place in the office (OK, it sat in the corner in a carboard box). I hadn't really examined it that closely; but now its time had come and with young Phil building Polar Bear...

Houstoun Gate Locomotive Works were a new one on me, but every scale has it's cottage industries hidden from the mainstream.  The upper shot is what I started with - a constructed chassis and part built body. You couldn't call it detailed, but it goes together very nicely. This detailing lark seems to be frowned upon in 16mm circles, mostly as you are viewing from a distance. 'It's a running scale' is the phrase oft used. I could add some louvres from coffee stirrers on the bonnet sides and an exhaust pipe, but then you start heading toward a seat, a driver and controls. It's a nice distraction.
BTW, thanks to the huge number of you dropping by yesterday, heading toward a thousand in one day.

Tuesday, 17 July 2018

16mm Garden rail track

From a dismantled 16mm line. 9 points, 3 slips, and 25+ yards of track. Free to pick up.
UPDATE: now gone. Unsurprisingly.

Tuesday, 14 June 2016

Garden railway track laying

A bit more on the curve: The curve at the other end wanders around all over the place, here on the left was going to be simple... or so I thought, using Peco 2'6" rad setrack curves. Most of the line at this end is laid on 4" wide building blocks; slight engineering overkill, but easy to remove being let into a hole, levelled up and the track screwed to them with 25mm No4s. Any changes or new house owner will just need a small crosshead screwdriver and to lift the block out before backfilling.

All went well until I got to about 2 o'clock on the photo then the spade hit a brick. 'Building rubble' I thought. No chance, it was laid, and kept going down. As this was sheep grazed downland pre-1935 I though gate post or possibly drinking trough base. Then there was a bit of black electrical wire in it and it dawned on me that I'd hit the air raid shelter. Next door but one pulled his out last year, but that was corrugated iron and at the top of the garden. The lavs were inside when built so it's not one of those. Anyway the job suddenly tripled in time length as I set to work with a 2lb hammer and a bolster to break all the brickwork up remains of which can just be seen at 12 and 9 o'clock on the curve.

I'd decided to put a Tri-ang style tunnel over to visually break the curve so a few bricks and a paving slab went over the top with clearance to W & L loading gauge which is more than enough on this radius.

Sunday, 12 June 2016

Art of Compromise and outside in the garden

 Bouncing around between different projects seems to be the order of the day and this is turning into more of a weekly report. Above and below are a couple of snaps taken in available light of the AoC. Top is an absolutely straight build of a Ratio GWR brake that was done years ago complete with squeaky plastic wheels. To its left is a Coopercraft V5 van with the firms replacement vent ends.
Below, a more overall shot of the coal dock with a mix of stuff parked up. L-R: a Cambrian Open A, a Slaters PO, both straight builds and an Arfix PO body mounted on a Parkside underframe. I like the way I've managed to get these to all have a slight prototypical dip so there visual horizontal line is imperfect. I must paint the coupling supports.
 Moving outside, the line is now just about complete. As you can see it's simply a loop - a trainset complete with short tunnel on the left. This is the only flatish part of the garden. North of the third stepping stone the ground lurches upward meaning that the lower bit of the loop is raised slightly and the upper is cut in. I was chuffed that I'd only gained an inch in height by the time the loop was complete with just a Poundland level to work with. More on this later.

Friday, 3 April 2015

Navigating

The town of Lewes is ringed by roughly four housing areas. The Roman/Norman part of the town sits on the strip from the Ouse Valley up to and around the castle site; the housing is arranged loosely around this on the hillsides. If you want flat walking you don't move here as any walk involves a hike up a stiff gradient sooner or later. Why am I telling you this? Well mainly for historical reasons we live at just about the highest point of all this, half way up the Downs, yards from the 1264 battle site.
Now accepted wisdom states that model railways in the garden need to be flat -  I don't got flat... I got about a 1 in 15 slope at the bottom which winds up even steeper at the top. So why an I building  something outside? 
This is true civil engineering: cut-in at the top and raised on a bank at the bottom (the trackbed  in the photo is 12" decorative  walling blocks). So far I've managed to use bits of walling and tat from around the garden. That's now run out, but track is now down (1" brass screws rather than my usual cut-down Peco pins) and the inaugural light engine ran around the first 10' feet of track with a Mk1 Dr Martin buffer stop in use.
This is all weirdly different from building baseboards. 

Tuesday, 31 March 2015

Papery bits and grass clippings

With the fun and sheer hair-raising excitement of the Member's Day well and truly over and Morton Stanley put back in the toybox until Expong, it's time to look to smaller and bigger beasts. There is now a three pronged attack which is weather and time dependent. If it's reasonable outside I could continue a little work on the 16mm, if not too late then I can bang and saw on the foundation work for the AoC and if it's two in the morning a little work on the cardboard essay which I've named Castle Sidings. And with Mrs.F on school holidays the likelihood of me getting any modelling done is remote.

Tuesday, 17 March 2015

Rainy days and mondays

For some reason I'm not getting much done at the moment - well indoors anyway. there's been some progress on the something 3 piece, and the above, which in all honesty is a bit of a giggle, turning a 4mm Wills kit into a FR style 7mm quarryman's coach. This is primarily to give us another coach option for Morton Stanley at the Sussex Downs Members Day in a couple of weeks. Dimensionally it's spot on. Aesthetically; I'm not so sure. I'll press on.

Outside things are moving. I've got about 40' of trackbed down using concrete blocks and whatever else is lying around. This is very new territory for me and I'm still not convinced of its likely success. The target is to get about a third of it down this summer. In this respect I'm on the game with only about 10' to go with the  substructure.

Saturday, 28 February 2015

Fresh heir.

The gentle move into the outside moved a wee bit closer with the completion of the first loco. It's all a bit experimental and I've made some enormous cock-ups. The most important thing is that I have something that will pull a couple of wagons around to at the very least use as a test machine. It's mostly 60thou plastic with a few bits and pieces from the materials box. One of the learning-curve aspects was to know where to stop. In the smaller indoor scales it's the detailing which defines the modelling, though most employ the 3' rule - if it can't be seen from three feet away there is not a lot of point. Here that jumps to 30', so it is very much essence of industrial diesel rather than exactitude with influences from Hudson, Ransome and Ruston.

Saturday, 14 February 2015

Saturday Ramble The great tidy up

The smaller one is nearer and the bigger one is further away...

The faded white of my Argos work bench is 70% visible now. Pecketts have been painted and F&B coaches have had roofs covered in bog paper and couplings fitted. Now I'm in full flow with the relative bulk of the diesel. This is a bit of a jump even from the 7mm stuff and it's only a tiny loco.

I'm entering a modelling phase. Odd? There's a difference. Layout building is a set of ordered projects that are of a one and have a natural sequence: Baseboard, track scenery, buildings trees etc. Modelling is something smaller - contained. The above are an add on for Tal-coed and a little trial piece - not related and no specific reason... they just are. This is quite freeing. There is no deadline as such and I definitely don't need them. There are a lot of these in the cupboard; things that could be made just for the hell of it: 4mm wagon kits, signal kits even a Airfix Victory which I would insist on painting 'in service' black rather than the pretty stripes.
And so the tidy up continues, just for a while, just until I can see the bench again.

Monday, 29 December 2014

16mm scale Hunslet

This is all a bit weird. I honestly have not got a clue what I'm doing with this, but I'm simply making one part at a time and seeing how it goes.
Bonnet front went on in the early hours -  a piece of 60 thou 50 x 44 with a hole cut in it, then added to the back of that a piece of car body fill mesh that I must have had in the box for the best part of thirty years awaiting this sort of thing.
I did ponder on a freelancy name such as Hudslet or Rudson etc, but even though Hudson never built anything remotely close to this design it felt better. Lettering is of course from Coopercraft's station nameboard set for 4mm.
Now I might take a bit of a break from it and back to something more serious and pressing in 7mm.

Saturday, 27 December 2014

16mm battery loco

Back in June I reviewed an IP Engineering basic chassis kit for 16mm.

http://unnycoombelala.blogspot.co.uk/2014/06/a-salt-and-battery.html

Over the last couple of days I've played about wrapping something around it.
This is a big learning curve.
1. On say an 009 kit/build, you just need to worry about where the motor will fit. Here there is the issue of motor, power and control all on board.
2. It's heavy. Not lead-heavy, just so much bigger even with a tiny prototype

This is only a small Hudson 20hp style shape, and yet it is 5" long. I wanted to keep the cab clear so ended up mounting the battery box on the underside of the bonnet top. More thought process - you need to be able to change the batteries so there has to be an easy entry. This gives a high bonnet, but as can be seen against the Coopercraft rubbish wagon, which is a pretty small vehicle itself, not that tall at 50mm which is a bit over a scale 3'. I've sketched the cab out at around 95mm high. Next technical problem is getting the switch wired and put somewhere. Though where that somewhere is, is another question altogether.

Tuesday, 10 June 2014

A salt and battery

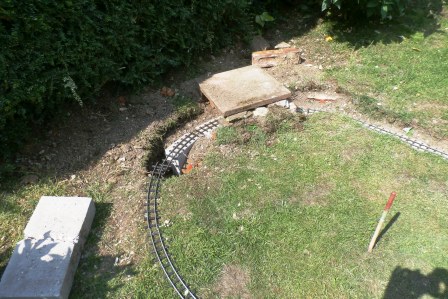
 Nigel wandered round last week and we spent the afternoon out in the sun throwing a few garden rail ideas around. But it was decided that I should get a loco up and running at least in basic form to see if the idea really bites.
I'll get a Roundhouse steamer I thought... err no they cost more than my entire profit for the year so off it was to the IP Engineering for a 'Budget battery chassis' for 26 quid.
I spoke to Mr. Engineering and he said he'd pop it in the post - it arrived this morning in a jiffy bag - a 16mm loco through the letter box. Fine service I thought. What do you get? Well a bit of steel U section pre drilled with nine holes, two wheelsets all nice and shiny, gears and battery holder and a motor. I have this lot together in half an hour I thought... what a prat.
First mental shift: I need a hammer to tap the wheels off - a hammer! So out came the vice and off they came. What fun I thought, and what fine value, why you can't even buy a blow up doll in Tescos for 26 quid. Remember Tescos?
This being single axle drive I put one of the wheelsets straight in. Great I thought, ten minutes and I've got half a chassis, I'll take a look at the motor. I read the instructions. Ha! instructions.... 'Fit motor with a couple of self tappers.' Now this is where it all started to unravel.I looked for self tappers in the bag... none. Then I realised it doesn't say ...'self tappers included'. This is bad on two levels. This is I assume a kit for someone like me with little or no experience of 16mm. If you said 'self tapper' to someone in the street would they know you meant a screw? First point. Second point - should this not have been mentioned before I bought the kit? After all fixing the motor is a bit of a critical part of making it run and let's face it not everyone has this sort of thing in stock. Even the size is not mentioned just 'self tappers'. Hmmm....
Luckily I'm in the habit of stripping any bit of electrical gear that goes kaput before I dump it. People think I'm stupid, but who has self tappers in a box? Moi. Clever eh? But not so clever that it took me a hour to find two that I could bodge into the motor casing without fouling the armature.
Onto gears. Plastic, nothing exciting. The worm went on the motor shaft no problem. The other bit of the set? Nah... The axle is about 1/8", the hole in the gear ain't. Instructions say 'fit and slide into centre'. Errm, the bloody hole is 1mm too small. Even with a bucket full of KY it's not going to slide.
I started by trying to ream-out with a square needle file. Not good enough. So I raked around in the toolbox for an 1/8 drill which I bought just for moments like this, and gently opened the hole up until it was a very tight fit and not in need of the instruction's recommended super glue.
 I re-fitted the motor and it all meshed beautifully. I then lashed up the batteries with blu-tack.
Second mental shift: I ain't on rails, there's no controller. If you connect it up it flies across the table entirely independent of any other being like a chicken on the end of a soldering iron. There's no knob to turn, you have to run after the bloody thing! This is definitely a work in progress.
There are also two single pole two way slide switches included. Why? Wouldn't it be better with one DPDT like a controller with a centre off-right to go forward , left to go backwards and centre to sit still and smile at you. Maybe someone can explain this bit cos guess what, the instruction don't mention wiring or switches at all.
Apart from the screw, switch and hole issue (boy is this post going to get some interesting hits) all this for what amounts to the price of about three packets of fags is a bit of a bargain. Now, what to build on it.